
MTGPress proxy printing became popular because it solved a very specific Magic problem: players wanted a fast way to turn a decklist into printable proxy sheets without manually resizing 100 card images in Photoshop like it was a punishment from the Azorius Senate.
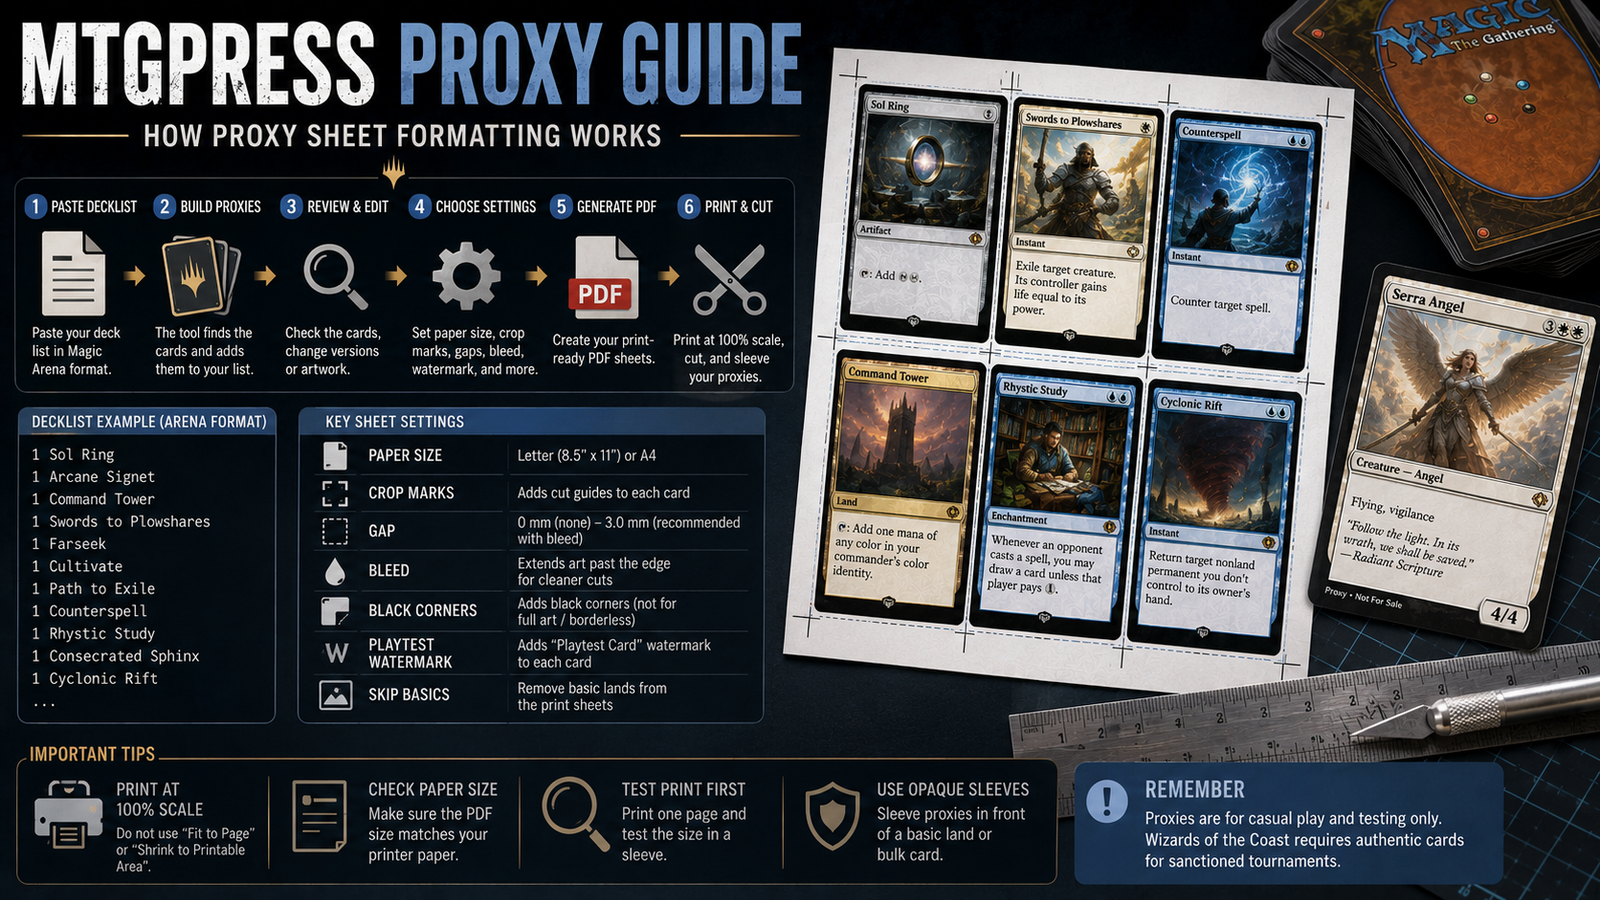
The original MTGPress-style workflow is simple. You paste in a card list, build the proxies, choose versions or artwork where available, generate print sheets, then print, cut, and sleeve the cards. Today, many players use MTG Print as the more current replacement or equivalent tool because it offers the same basic idea: paste a Magic Arena-style decklist, generate a PDF with the cards laid out, print the PDF, and cut the proxies for playtesting. MTG Print describes itself as a free CardTrader service for proxying Magic decks with a home printer.
This guide explains how proxy sheet formatting works, what the main settings mean, and how to avoid common mistakes with paper size, scaling, crop marks, bleed, gaps, and double-faced cards.
A proxy sheet formatter takes individual card images and places them onto printable pages. Instead of downloading every card image, resizing each one, and arranging them by hand, the tool creates a layout automatically.
In most cases, that means a grid of Magic-sized card images on a Letter or A4 sheet. The tool does the spacing, page breaks, and alignment for you. Some versions also let you choose card art, include crop marks, add gaps, apply bleed, print tokens, skip basic lands, or add a playtest watermark.
A third-party proxy tools list describes MTG Press as a site for making printable PDFs for deck testing and notes that MTGPrint.net is now used as the replacement. That distinction is useful because many players still say “MTGPress” casually when they really mean any MTGPress-style proxy sheet generator.
The normal workflow looks like this:
Paste a decklist into the proxy tool
Build or submit the list
Review the generated cards
Change printings or artwork where possible
Choose paper size, crop marks, bleed, gap, and scale settings
Generate or print the PDF
Print at 100 percent scale
Cut the cards
Sleeve the paper proxies in front of basic lands or bulk cards
That is the entire appeal. You are not creating collectible-grade custom cards. You are creating readable playtest pieces for casual use, testing, Commander pods that allow proxies, or cube planning.
Wizards of the Coast has said sanctioned events require authentic Magic cards, with judge-issued proxies only in limited cases when a card is damaged during an event. Wizards also distinguishes personal, non-commercial playtest cards from counterfeits, which is the right way to think about paper proxy sheets.
Proxy sheet tools are only as good as the card list you give them. A clean list is easier for the tool to parse.
A simple format usually works best:
1 Sol Ring
1 Arcane Signet
1 Command Tower
1 Swords to Plowshares
Some tools handle Arena exports, Moxfield exports, Archidekt exports, or other deckbuilder formats better than others. MTG Print specifically asks users to paste a deck in Magic Arena format before generating the ready-to-print PDF.
Common input mistakes include:
Leaving extra sideboard labels in the wrong place
Using “x” after quantities if the tool does not support it
Misspelling card names
Using nicknames instead of official card names
Forgetting the second face of older double-faced cards in older tools
Mixing set codes into a format the tool does not understand
If a card does not appear, check the spelling first. It is almost always the spelling. Magic card names are full of apostrophes, commas, subtitles, and names that look like someone dropped a fantasy dictionary down a staircase.
Older MTGPress guides often mention hovering over a generated card to choose the version or artwork. A widely shared Reddit guide for MTGPress noted that after building a list, users could hover over the art and select the version they wanted from a dropdown.
That feature matters because many Magic cards have multiple printings. A proxy sheet for Commander might use the prettiest version. A cube test sheet might use the most readable version. A playtest deck might use the newest Oracle text or a familiar old border.
When choosing art, prioritize readability. Fancy variants are fun, but if the card name, mana cost, or rules text is hard to read after printing, the proxy has failed at its one actual job.
One of the most common proxy sheet problems is using the wrong paper size. Letter paper is 8.5 x 11 inches and is standard in the United States. A4 is 210 x 297 mm and is common in many other countries.
If a proxy PDF is formatted for A4 but printed on Letter, the bottom row can be clipped or the printer may shrink the entire page. MTG Print’s FAQ specifically says that if some cards are cut because they do not fit, users should check whether they selected the correct paper size, especially when accidentally printing an A4 sheet on Letter paper.
Before printing, confirm:
Your PDF page size
Your physical paper size
Your printer paper tray setting
Your print dialog paper size
Your scale setting
Do not assume the browser or printer driver guessed correctly. Printers are not known for their moral courage.
Scale is the setting that ruins the most proxy sheets.
If the card images are correctly sized in the PDF, the page needs to print at 100 percent, also called actual size or 1:1. If the print dialog uses “fit to page,” “shrink to printable area,” or “scale to fit,” the cards can print smaller than intended. MTG Print’s FAQ directly addresses this issue and says that when cards print smaller than real cards, the likely cause is a print option like “fit to paper” instead of 100 percent scale.
For home printing, use:
Actual size
100 percent scale
No fit to page
No shrink oversized pages
No scale to printable area
After printing the first sheet, cut one proxy and sleeve it in front of a real Magic card. If it lines up cleanly in the sleeve, you are good. If it is noticeably smaller, check scaling before printing the rest.
Crop marks are small guide marks that show where to cut. MTG Print’s FAQ says the crop marks option prints marks on the corners of the cards to help with cutting.
For paper proxies, crop marks are usually helpful. They make cutting faster and reduce guesswork. Without them, card borders can blur together, especially when you are cutting several pages in a row and your patience starts taking combat damage.
Use crop marks when:
You are cutting by hand
The cards have dark borders
Cards are printed close together
You are printing many pages
You want cleaner alignment
Skip crop marks only if they interfere with the layout or if you are using another cutting guide. Crop marks should stay outside the card face, not appear across the playable card image.
The gap is the space between cards on the sheet. MTG Print’s FAQ explains that the gap option adds extra space between cards to make cutting easier, with no gap, 0.2 mm as a default style option, and 3.0 mm recommended when using bleed.
No gap saves space but makes cutting less forgiving. A small gap gives your scissors or blade room to work. A larger gap is better when bleed is enabled because the card image extends past the normal edge.
For most home users, a small gap or crop marks are worth using. They make the cutting stage less miserable. And cutting proxies already has enough “why am I doing arts and crafts at midnight?” energy.
Bleed extends the card image beyond the normal edge. This helps prevent white edges when the cut is slightly off. MTG Print’s FAQ describes bleed as extending the card image into extra space around each card and recommends using bleed together with a 3.0 mm gap for best results.
Bleed is most useful when:
You are cutting by hand
You want cleaner edges
You are printing full-art cards
You dislike white slivers along borders
You are using a ruler and knife instead of scissors
Bleed is less critical for quick sleeve inserts, especially if the proxy sits in front of a basic land in an opaque sleeve. But if you care about appearance, bleed helps.
The tradeoff is that bleed uses more space. You may fit fewer cards per sheet or need more room between cards. That is normal.
Some proxy sheet tools include a black corners option. MTG Print’s FAQ says this adds squared black corners to the cards and warns that it is not suitable for full-art or non-black-bordered cards.
Black corners are meant to make cut paper proxies look cleaner when sleeved. They can hide tiny edge imperfections and help bordered cards blend into the sleeve better.
Use black corners for:
Traditional black-border card proxies
Quick playtest sheets
Sleeved paper inserts
Avoid black corners for:
Full-art cards
Borderless cards
White-bordered cards
Custom frames
Tokens with unusual layouts
If the card design does not have black borders, black corners can look odd. This is one of those settings that helps some sheets and makes others worse.
A playtest watermark is a responsible-use feature. MTG Print’s FAQ says users can apply a watermark with the text “Playtest Card” so the proxy is distinguishable from original cards.
For casual proxy sheets, this is a good idea. The point of a proxy is to test, play casually, or represent a card you are not using as an authentic tournament card. Clear markings reduce confusion.
A good proxy sheet should not be designed to deceive. It should be readable, useful, and clearly separate from a real Magic card. Use opaque sleeves, mark playtest cards clearly, and ask the group before playing them.
Double-faced cards are where proxy sheet formatting gets tricky.
MTG Print’s FAQ says users can type a double card name with a double slash, such as “Expansion // Explosion.” For double-sided cards, the FAQ explains that entering the front side or the full double-faced name will add both sides to the PDF, although the app view may only show the front side.
Older MTGPress workflows sometimes required more manual handling. The Reddit MTGPress guide noted that flip cards needed both sides added by name if the user wanted both sides printed.
The practical rule is simple: check the generated PDF before printing. Do not assume the back face is included. Look at every double-faced card, modal double-faced card, meld card, and split card before sending the file to the printer.
Options for double-faced proxies include:
Print both faces as separate proxy cards
Use a checklist-style placeholder
Print the front only and keep the real card nearby
Print both faces and sleeve in opaque sleeves
Use a helper card for the back face
For casual play, separate front and back proxies are usually easiest.
MTGPress-style tools are not just for main-deck cards. MTG Print’s FAQ says tokens can be printed by writing the token name, such as “Shark,” and emblems can be printed by writing the emblem name, such as “Chandra, Awakened Inferno Emblem.”
This is useful because token decks often need more physical pieces than players realize. A Commander deck may need Treasures, Clues, Food, creature tokens, copy tokens, emblems, and reminder cards. Printing them in the same proxy sheet workflow keeps the whole deck package together.
Before printing tokens, make sure you selected the right version. Many tokens share names but differ in color, power, toughness, or abilities.
Some tools let you print card backs. MTG Print’s FAQ says users can print the back of the card by writing “back.”
For sleeve-insert proxies, card backs are usually unnecessary. You print the fronts, cut them out, and sleeve them in front of basic lands or bulk cards. Opaque sleeves hide the real card behind the paper.
For double-sided paper proxies, card backs are more complicated because front-back alignment is hard on home printers. Even a small shift can make the sheet awkward. If you want double-sided proxies, run a small test first and mark the paper orientation before printing the second side.
For most casual use, single-sided fronts in opaque sleeves are simpler and better.
Sometimes a proxy sheet looks soft because the source image is low resolution. MTG Print’s FAQ notes that some older cards may only be available in low resolution, while newly released cards may be updated with higher-resolution images after a few days.
This is one of the limitations of automated proxy sheet tools. They are fast, but image quality depends on what the tool can access. New cards, old cards, odd promos, special frames, and certain alternate versions may not always look equally sharp.
If image quality matters, generate a test PDF and zoom in before printing. Check small rules text, mana symbols, and borders. If they already look bad on screen, printing will not magically improve them.
Some older MTGPress workflows generated a print view rather than a direct PDF download. In those cases, users saved the sheet through the browser print dialog by choosing a PDF printer. A Reddit guide for MTGPress described selecting a PDF option such as Microsoft Print to PDF after clicking print, then saving the file locally.
Modern tools like MTG Print make this more direct by offering a downloadable PDF with the cards laid out and ready for printing.
Either way, the goal is the same: get a stable PDF so the layout does not change between preview and print.
After printing, cut carefully. A paper cutter, rotary cutter, metal ruler, or sharp craft knife will usually produce cleaner results than scissors. Scissors work, but they are slower and less consistent.
For best results:
Print one test page first
Use crop marks
Cut outer rows first
Keep cards in order
Sleeve in front of a basic land or bulk card
Use opaque sleeves
Check thickness against the rest of the deck
A common trick is to place the paper proxy in front of a real card with the back of the real card facing forward. That way, if the paper shifts slightly inside the sleeve, the visible background behind it is cleaner than a random card face. The older MTGPress Reddit guide recommended sleeving proxies with the backing card flipped so the card back faces the front of the sleeve.
For a typical casual proxy deck, use this setup:
Correct paper size: Letter or A4
Scale: 100 percent
Crop marks: On
Gap: Small gap for basic cutting, 3.0 mm if using bleed
Bleed: On if you care about cleaner cuts
Black corners: On for normal black-bordered cards, off for full-art cards
Playtest watermark: On
Print decklist: Optional
Skip basic lands: On unless you need land proxies
Then print one page first. Always.
MTGPress proxy formatting works by turning a decklist into a printable card grid. The tool handles sizing and layout, but the user still has to choose the right paper size, print at 100 percent scale, decide whether to use crop marks, set gaps correctly, and check bleed before printing.
Most problems come from boring settings. Wrong paper size clips the bottom row. Fit-to-page scaling makes cards too small. No crop marks makes cutting annoying. No bleed can leave white edges. Double-faced cards can be missing if you do not check the PDF.
Use MTGPress-style tools for what they are best at: fast, readable paper proxies for testing and casual play. Keep them clearly marked, print one test page, and sleeve them in opaque sleeves. Do that, and the sheet formatter does exactly what it should: gets you from decklist to playable cards without making you manually arrange 100 tiny rectangles.